Steps
- Prepare an InDesign template.
- Arrange data into a suitable format for the InDesign template to understand.
- Import the data into the template
Why read this article?
Setting up the InDesign template is an one-off job, with one sample product entry. You write the XML transformation code once. Then, when you import the data, the single-book template replicates itself to create as many catalogue entries as there are product records in your data — potentially thousands and thousands of catalogue entries with a single click. Then reuse your template and code for the next season’s catalogue.
What is ONIX?
ONIX is a way of sending rich book data to the companies who need it – Nielsen, Bowker and so on. But ONIX’s comprehensive nature means that it can be quite verbose. In a catalogue, we don’t need every last bit of information about a product. So we’re going to convert our ONIX XML message into another XML file that’s less wordy, using a language called XSLT. Then we’ll be able to import it into InDesign. (In fact, InDesign can handle the conversion process itself, when we import the XML.)
Get the backlist demo files
Download the files here [zip file, 15mb]. This zip file contains an InDesign template for many products per page, and some sample data.
Get the frontlist demo files
There’s a further set of demo files for a frontlist catalogue containing one product per page, which take a similar approach, described here:
Regardless of whether you’re trying out the frontlist or the backlist demo, the following notes describing the backlist files should help.
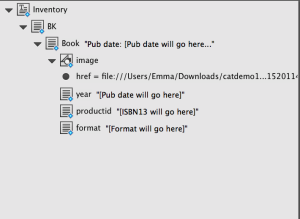
Here’s the structure pane of our backlist InDesign template, showing how each entry will be structured: we’re going to need to whittle our ONIX down until we’ve got an XML file that matches this structure.
To prepare the data for it, using an XSL transformation:
Open the XSL code file
Open transform.xsl: this is how the transform.xsl file looks.
Line 1 tells the computer that this is an XML file.
Line 2 defines the first tag, called <BK>
and gives a bit more information about this part of the file – which is that this code is XSL.
Iteration
Line 3 means “find each mention of ONIXMessage/Product in the ONIX file.”
1
  <xsl:for-each select='ONIXMessage/Product'>
Define a new tag
The next bit defines a new XML tag, called
1
  <Book>
If you look ahead to line 24, you’ll see its sister, the closing tag. We know it’s a closing tag because of the backslash.
1
  </Book>
Variables
Lines 5 to 7 set up some variables. A variable is like having a shortcut. For example, I can define a variable called “address”:
1
  address = “Chiltern House, Thame Road, Haddenham, Aylesbury, Buckinghamshire HP17 8BY, UK”
Now, next time I want to give my office location, I don’t have to spell out the whole address. The variable “address” is a shorthand way of saying the whole thing.
Back to our code. The next lines define three variables on the next lines: one called form, one called date and the other called isbn, so we can use them later. The values of the variables come from the ONIX file. The data tagged up with ProductFormDetail is assigned to the variable called “form”.
Similarly, the value in the ONIX tagged up as PublicationDate is saved as the variable date.
A more complex variable
Lastly, the ONIX tagged ProductIdentifier[ProductIDType = ’03’]/IDValue gets set as the variable called isbn.
1
2
3
4
5
6
7
8
  <ProductIdentifier>
    <ProductIDType>02</ProductIDType>
    <IDValue>0954575989</IDValue>
  </ProductIdentifier>
  <ProductIdentifier>
    <ProductIDType>03</ProductIDType>
    <IDValue>9780954575984</IDValue>
  </ProductIdentifier>
There are two ProductIdentifier tags here and this code selects the one with ProductIDType 03.
Image tags
Line 8 defines another XML tag, called <image>. Because it’s an image tag, it takes an href attribute. It uses the isbn variable, defined above.
1
  <image href=\file:///{$isbn}.jpg\ />
1
  <image href=\"file:///9780954575984.jpg\" />
Converting data into a new format
The next line defines a new XML tag, <year>. It uses a new XSL command:
1
  <xsl:value-of>
Line 9 says “Get the value of the date variable”. It also amends the date format.
If we wrote:
1
  <xsl:value-of select=\"$date\"/>
… then the new <year> XML tag would read <year>20120228</year>. But ISO-format dates are not appropriate in a catalogue. Instead we want it to read <year>28/02/2012</year>. So whilst this looks complicated at first glance:
1
  concat(substring($dt,7,2), ‘/’,substring($dt,5,2), ‘/’,substring($dt,1,4))
What it’s doing is saying:
- Concatenate the following things in the brackets:
- First, get the value of the date variable, which is 20120228.
- Count to the 7th digit, which is 2.
- Then get the 2 following digits, which would be 28.
- Then put a backslash in.
- Next, use that same date variable and get the fifth number, which is 2, and then the next two digits, which gives you 02.
- Put another backslash in.
- Finally, get that same date variable, and get the first number, which is 2, and then the next four digits, which gives you 2012.
- All of that gives you 28/02/2012.
Getting a value
The next line, 10, is also an <xsl:value-of>, and we use our isbn variable again. This line produces another XML tag called <productid>.
All these tags will be used in the InDesign document we’ll see in a bit.
Choosing an option
We’re going to look at the last XSL command for today, which is
1
  <xsl:choose>
On line 11, we have another XML tag, called <format>. But what to put in this tag? The syntax says “Choose from the following: when the ONIX form variable is B104, put in A Format Paperback. When the ONIX form variable is B105, put “B Format Paperback” in our new <format> tag.” And so on.
Importing to InDesign
The next bit is best shown on video. Watch how to use this XSLT code to transform ONIX into a more concise XML file and automatically flow it into our InDesign template. (Watch it on HD to see the detail.)
Next steps
Use the files you’ve downloaded to practice, and then use your own company’s ONIX file to have a go. Then, tweak the InDesign template so that the colours and fonts are to your taste, and produce your own catalogue. Raise a ticket for more guidance.
I can recommend A Designer’s Guide to InDesign and XML even though it’s old (the technology hasn’t changed much in the last 15 years) which contains even more templates and excellent descriptions of how to start using InDesign programmatically.